Talking to Neo4j graphs
In this post, I will cover all the main details regarding developing my entry for the Neo4j Challenge.


In this post, I will cover all the main details regarding developing my entry for the Neo4j Challenge.
The main objective of this challenge is to create a Heroku-ready template or demo application using Neo4j. So, I thought to myself: — what kind of application would be nice to show up in this contest?
After many ideas, here it is! In short, the application is a Stock Exchange symbol lookup using Neo4j and your voice.
Ok! Let me explain what I did.
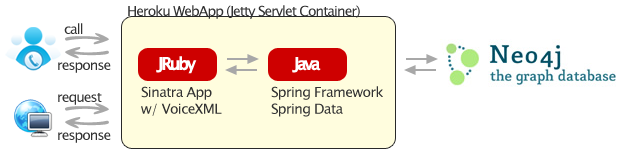
My main objective was to try to combine all the joy of Ruby programming, with the power and ease of use provided by the awesome Spring Data Neo4j, Spring Framework, and JVM, to this amazing piece of software called Neo4j which let me curious since 2011 in the Jim Webber talk at QCON conference of that year in São Paulo.
So, to start things up, JRuby comes in as a perfect fit. It also allowed me to use Sinatra to easily develop the user interface (both, voice interface and GUI). I choose Sinatra in this case because of its simplicity and as long the application stays small, it beat Rails (as said by @DHH).
Jetty is another very nice (and old) project, which provides a Web server and javax.servlet container, plus support for Web Sockets, OSGi, JMX, JNDI, JASPI, AJP, and many other integrations, and can be used to develop self-contained applications. In this article from Heroku blog, we have a nice introduction to creating a Java Web Application using Jetty. Its integration with Maven was also another motivation point.
Talking about Maven, possibly in POM.xml resides one of the trickiest parts of the application.
After configuring all the dependencies, aspectj-maven-plugin, jetty-maven-plugin, let's look at the configuration of appassembler-maven-plugin and jruby-rake-plugin:
jruby-rake-plugin:
<code>
  <executions>
    <execution>
      <id>install-bundler</id>
      <phase>process-resources</phase>
      <goals>
        <goal>jruby</goal>
      </goals>
      <configuration>
        <args>-S gem install bundler --no-ri --no-rdoc --install-dir vendor/bundle</args>
      </configuration>
    </execution>
    <execution>
      <id>bundle-install</id>
      <phase>process-resources</phase>
      <goals>
        <goal>jruby</goal>
      </goals>
      <configuration>
        <args>script/bundle install --without development:test</args>
      </configuration>
    </execution>
  </executions>
</code>
As we can see, the plugin execution is responsible for downloading and installing Bundler, then next executing the specified script which lives in the application script folder. This script basically starts the Bundler client (pre-configuring ENV['GEM_HOME'], ENV['GEM_PATH'] and ENV['BUNDLE_GEMFILE']), and following the parameters, all gems except the ones for development and test groups, are installed.
Last, but not least, the appassembler-maven-plugin:
<code>
  <configuration>
    <assembleDirectory>target</assembleDirectory>
    <extraJvmArguments>-Djruby.native.enabled=false -Djruby.cext.enabled=false -Djruby.compat.version=1.9 -Xmx256m -Xss2048k</extraJvmArguments>
    <programs>
      <program>
        <mainClass>org.jruby.Main</mainClass>
        <name>jruby</name>
      </program>
    </programs>
  </configuration>
</code>
Above we have the configuration for the assemble goal execution. The trick here is to generate the executable with JRuby (org.jruby.Main) as the main class. And you can also set extra JVM arguments, like the version of Ruby language to use.
After this brief look into POM.xml, let's see how Heroku starts Jetty. This is defined in the Procfile:
web: sh target/bin/jruby -S config/jetty.rbSo, that's it! Now our app is running on Heroku Cloud! For more details take a look into /config/jetty.rb to see how Jetty is being started up and /src/main/webapp/WEB-INF/web.xml to see the JRuby-Rack configuration. Other technical details you can find in the application readme file.
Now, let's talk about Neo4j.
Back in 2011, Jim Webber let me very interested in Neo4j with his talk at QCONSP 2011. Maybe because that year I was working on my final graduation project — a recommender system to support fundamental analysis of the Stock Market using natural language processing, and I never forgot one thing that he said. More or less like this: "MapReduce processing between HTTP requests can be very expensive! Some problems cannot be resolved with this approach.". Well, I did this. And I must confess: a graph database would have changed a lot my project.
So, when I discovered this challenge, I decided "- ok, now is the time to take a closer look at Neo4j.".
The first thing I did was access the Neo4j download page and downloaded the 1.6 Community version.
After that, the server installation. It is super easy. Just follow these instructions.
So, what's the next step? Learn, learn and learn!
I was able to make some initial experiments very fast after a dynamic reading of this superb online resource: Good Relationships: The Spring Data Neo4j Guide Book. Thank's to Michael Hunger, David Montag, Andreas Kollegger for this material.
Also, I learned a lot from the following links:
And that's it. This is the magic of open-source software. Curious about how one given thing works? Go to the source code and read it! All you need to get started with Neo4j is this. Trust me ; )
I used Arbor.js library to display the Neo4j data to the user. But how differently the information can be visualized? Through voice interfaces of course!
As I already worked with Voice Interfaces some years ago (in 2008 actually, when I won the Sun Students Contest. More info here and here), this was not a mystery. Again I used VoiceXML markup language, and the free service provided by Voxeo. Refer to the links above for more information about VoiceXML.
Sinatra eased this part even more, through its easiness of building APIs-like applications. All VXML interfaces and grammars are below the /app/views/voice folder and there are only two voice routes in application.rb.
Using the Voxeo service is simple. You only need to create an account, and after that, set up a new application through Voxeo Application Manager, informing the voice entry point of your application (the full URL to your route. In my case to the get /voice/index.vxml route).
Note that your application needs to be accessible by Voxeo server. So don't forget to git push Heroku master, before setting up your app on Voxeo.
Finishing, you'll get the numbers for your application. I always tested with a Skype VoIP number. Works very well here in Brazil and is totally free.
You can try calling to NeoQuotes! This is the Skype VoIP number: +990009369996189207 (to see all available numbers for NeoQuotes access the application and click on the respective top nav bar link).
Important: When you spell the stock symbol, say one letter, and wait for the voice to repeat what you just said. And go on. When you finish, you can say "Okay!", "Go!" or "Search!" for example. If the symbol has an '.' you have to say "dot". The voice will not repeat this (will stay in silence). Just continue with the letters or numbers.
This demo application contains an interesting stack of technologies, providing an environment to develop robust and testable Neo4j applications, with a lot of fun. Certainly much more can be done and improved. And you can help fill issues and submit pull requests!
Please, help to vote in this application at Gensen repository or help with a Tweet!
Thank you Neo4j for running this challenge! It was so enjoyable to participate.