AWS Opsworks Deployment
Back in 2013, AWS announced a new service called OpsWorks. Let's look at its actual state and how you can deploy your Ruby on Rails applications there.


Back in 2013, AWS announced a new service called OpsWorks. Let's look at its actual state and how you can deploy your Ruby on Rails applications there.
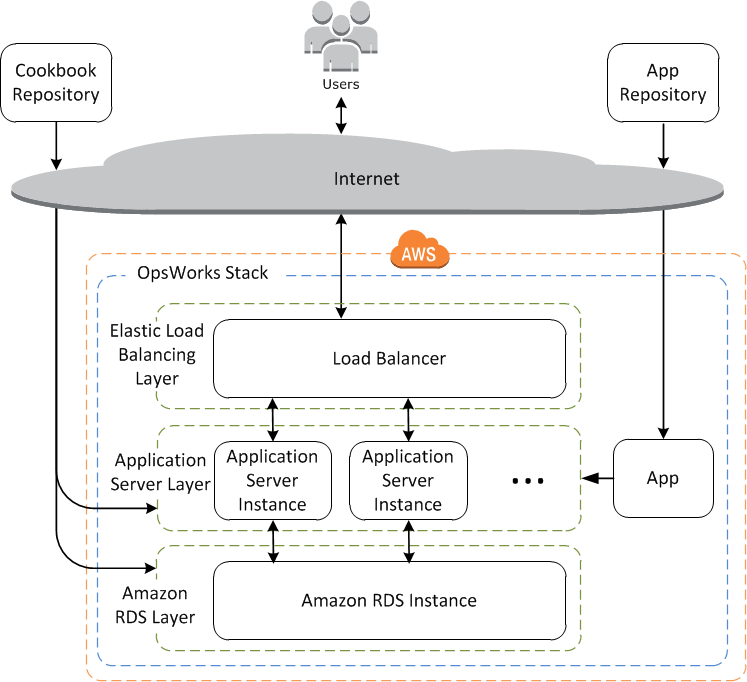
OpsWorks is an application management service for managing applications of any scale or complexity on the AWS cloud. You can think of it as something between Heroku or Beanstalk and a manually configured server environment.
- AWS Elastic Beanstalk is an easy-to-use solution for building web apps and web services with popular application containers such as Java, PHP, Python, Ruby, and .NET. You upload your code, and Elastic Beanstalk automatically does the rest. Elastic Beanstalk supports the most common web architectures, application containers, and frameworks.
- AWS OpsWorks is a robust end-to-end solution that gives you an easy way to manage applications of nearly any scale and complexity without sacrificing control. You model, customize, and automate the entire application throughout its lifecycle. OpsWorks provides integrated experiences for IT administrators and ops-minded developers who want a high degree of productivity and control over operations
- AWS CloudFormation is a building block service that enables customers to provision and manage almost any AWS resource via a domain-specific language. You define JSON templates and use them to provision and manage AWS resources, operating systems, and application code.
The main concepts of OpsWorks are:
- Stacks: a stack represents a collection of EC2 instances and related AWS resources that have a common purpose and that you want to manage collectively. Within a stack, you use layers to define the configuration of your instances and use apps to specify the code you want to deploy.
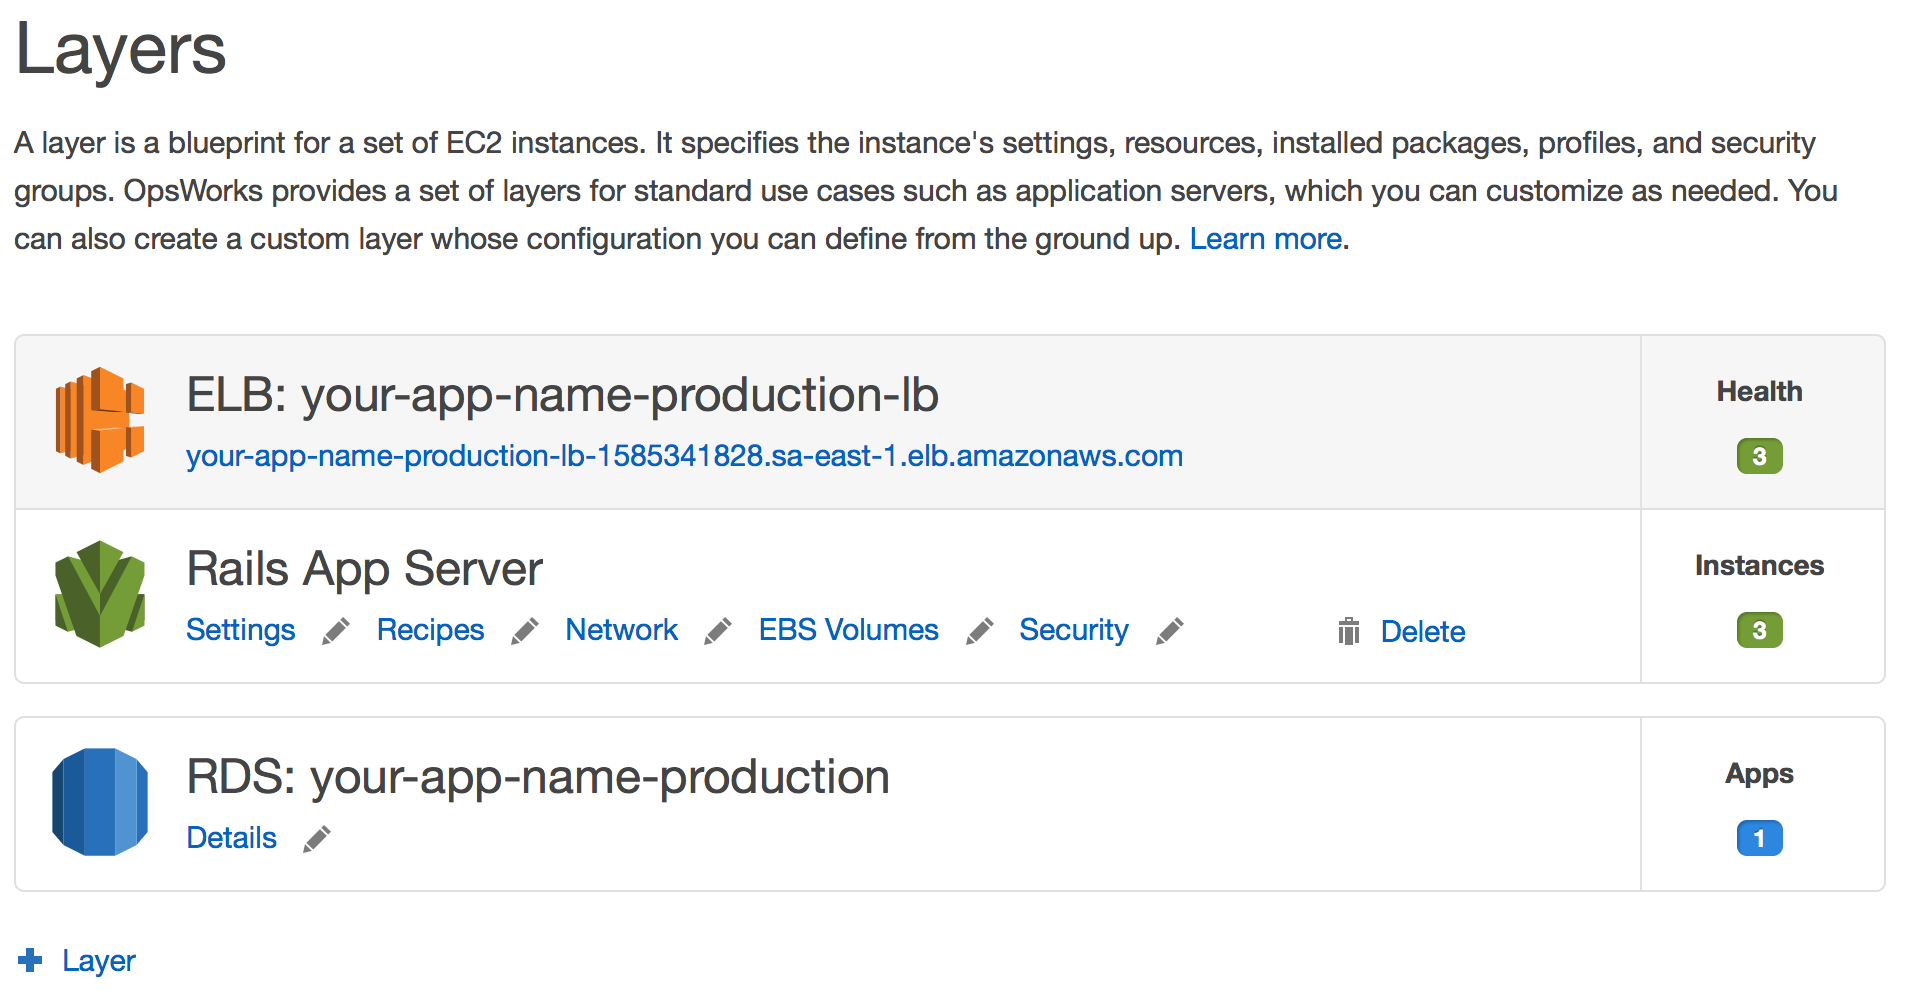
- Layers: a layer is a blueprint for a set of EC2 instances. It defines the instance's settings, resources, installed packages, profiles, and security groups. OpsWorks provides a set of layers for standard use cases such as application servers, which you can customize as needed. You can also create a custom layer whose configuration you can define from the ground up.
- Applications: an application represents code stored in a repository that you want to install on application server instances. When you deploy the application, OpsWorks downloads the code from the repository to the specified server instances.
- Instances: an instance represents a server. It can belong to one or more layers, that define the instance's settings, resources, installed packages, profiles and security groups. When you start the instance, OpsWorks uses the associated layer's blueprint to create and configure a corresponding EC2 instance.
There's no charge for using OpsWorks. You pay only for AWS resources being used like EC2 instances, RDS databases, etc.
OpsWorks uses Chef to configure the layer's EC2 instances. Chef turns infrastructure into code. With Chef, you can automate how you build, deploy, and manage your infrastructure. Your infrastructure becomes as versionable, testable, and repeatable as application code. A Chef recipe defines everything that is required to configure part of a system. And a Chef Cookbook is a collection of recipes.
You don't have to be a MasterChef (oh, 🤦🏻) to use AWS OpsWorks. There is a good set of predefined layer blueprints for standard use cases, all of them are open-source, available on opsworks-cookbooks Github repository.
This post focuses on how you can deploy Ruby on Rails applications on AWS OpsWorks. There are fantastic resources on the Internet explaining OpsWorks philosophy and how it works under the hood, so I won't repeat them here. You're invited to check the curated references at the end of this post.
Here is a collection of tips and tricks to help you deliver Ruby on Rails applications using AWS OpsWorks. Enjoy!
Log in to your AWS account. Select OpsWorks on AWS console. It can be found under the Deployment & Management product family.
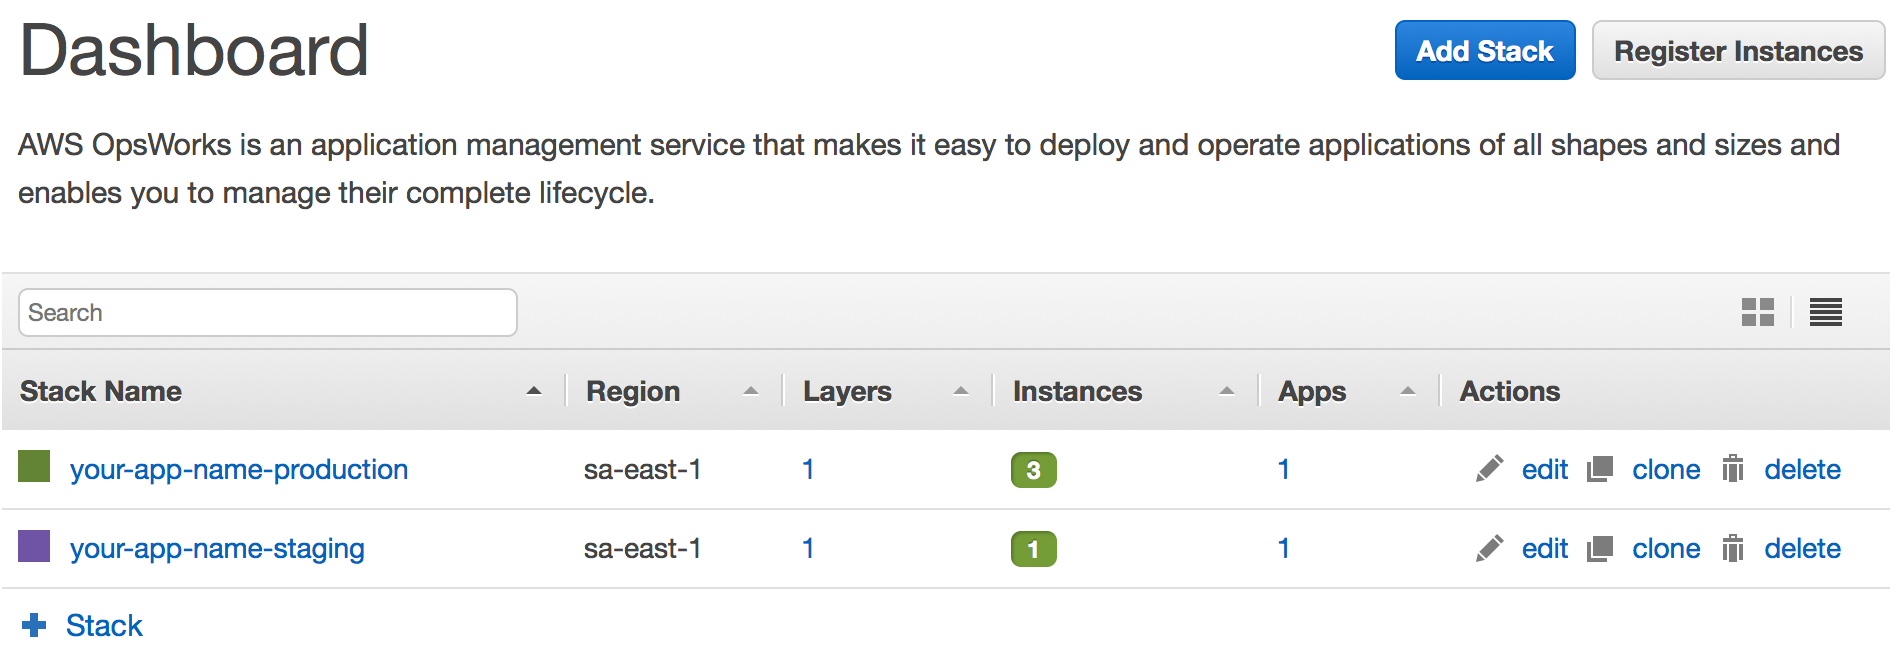
Tip Nº1: you can have many stacks as you want. Doing an analogy with Heroku, you can think of a stack as a new Heroku application. A completely new and isolated environment. Talking about environments, a common practice is to have multiple stacks that represent different environments, like staging, production, and so on.
Tip Nº2: when you are creating a stack, you have the option to set a Default SSH key for all future instances within the stack. So, a common practice is to create or import a key pair before creating a new stack. To do that, first, go to EC2 dashboard, click on Key Pairs option, and create or import your key pair. By doing so, all layers instances will have it configured and you'll be able to ssh those instances.
Tip Nº3: you can customize layer cookbooks using the custom JSON textarea. Chef cookbooks accept parameters in the form of node attributes. You need to check what parameters you can send to each cookbook (use the source). Check below one useful example:
{
  "opsworks_initial_setup": {
    "swapfile_size_mb": "512"
  },
  "unicorn": {
    "worker_processes": "2",
    "version": "4.9.0"
  },
  "nginx": {
    "worker_processes": "1"
  },
  "deploy": {
    "application_short_name": {
      "database": {
        "adapter": "postgresql",
        "type":"postrgesql",
        "encoding": "unicode",
        "min_messages": "warning"
      }
    }
  }
}
Tip Nº4: the swapfile_size_mb parameter above is especially useful when deploying Rails applications on EC2 micro instances (free tier) and use a deploy hook (that I'll share in minutes with you) to precompile your assets (imitating Heroku deploys). The assets:precompile command eats a lot of memory, causing the instance to run out of memory on every deployment if you don't increase the swap file size.
Tip Nº5: during the stack configuration you have the option to use custom Chef cookbooks. This is useful when setting node attributes aren't sufficient. By setting custom cookbooks you can go further and override some files written out by your layer's recipes, or even build a completely new and customized layer.
Every stack contains one or more layers, each of which represents a stack component, such as a load balancer, application servers, application databases, workers, and so on.
I can't do a good analogy this time with Heroku. However, you can think of a layer as a custom add-on, or your Heroku Postgres (which is an add-on in fact).
Tip Nº1: currently AWS OpsWorks provides a set of layers for standard use cases such as application servers, databases, etc., which you can customize as needed. Also, there is a special kind of layer to connect your RDS databases to your stack. This is perfect if you are coming from Heroku. First, go to RDS dashboard, create a new RDS Postgres database and then go to OpsWorks, select your stack, add a layer, and select the RDS layer pointing to the recently created database.
Tip Nº2: a typical Rails Application will have three or more layers:
- A Rails App Server layer
- A Load Balancer layer
- A Database layer
- N worker layers (yes, like your Heroku workers)
Tip Nº3: when you create the Rails App Server layer you have the option to select the Ruby version and other common settings. If you intend to use a load balancer for your App Server instances (which is highly recommended!), first go to EC2 dashboard and create a Load Balancer before creating the Rails App Server layer. A common practice is to name the load balancer with the stack-name plus the -lb suffix, resulting in your-app-short-name-lb.
Tip Nº4: create and attach a security group for your load balancer configuring the inbound and outbound traffic as follows:
Inbound:

Outbound:

Tip Nº5: if you use HTTPS for your application, you must upload the SSL certificate files to AWS IAM. An SSL Certificate allows you to configure the HTTPS/SSL listeners of your load balancer. You may select a previously uploaded certificate, or define a new SSL Certificate. To upload your certificate to AWS, ensure that all your certificate files are in PEM format. Follow the steps below if your certificate was issued by Comodo:
Extract the certificate files to a folder and cd to that folder:
cd /path/to/certificates/folder
mkdir out
Convert all certificates and private key:
openssl x509 -in ./AddTrustExternalCARoot.crt -outform pem -out ./out/AddTrustExternalCARoot.pem
openssl x509 -in ./COMODORSAAddTrustCA.crt -outform pem -out ./out/COMODORSAAddTrustCA.pem
openssl x509 -in ./COMODORSADomainValidationSecureServerCA.crt -outform pem -out ./out/COMODORSADomainValidationSecureServerCA.pem
openssl x509 -in ./your_issued_certificate_name.crt -outform pem -out ./out/your_issued_certificate_name.pem
openssl rsa -in ./server.key -outform pem -out ./out/server.key.pem
Create the CAChain:
cat ./out/COMODORSADomainValidationSecureServerCA.pem > ./out/CAChain.pem
cat ./out/COMODORSAAddTrustCA.pem >> ./out/CAChain.pem
cat ./out/AddTrustExternalCARoot.pem >> ./out/CAChain.pem
Finally, upload it to AWS IAM:
cd out
aws iam upload-server-certificate --server-certificate-name YourIssuedCertificateName --certificate-body file://your_issued_certificate_name.pem --private-key file://server.key.pem --certificate-chain file://CAChain.pem
Tip Nº6: if you use HTTPS for your application, configure the load balancer health check to use HTTPS for the ping protocol. Set only an / as the ping path.
Tip Nº7: to use an RDS Postgres database layer along with your Rails application, you need to configure and apply a Security Group to your database instance allowing any source IP to access your database. To do that go to EC2 dashboard, select Security Groups option and create a new security group with the following inbound and outbound rules:
Inbound:

Outbound:

Tip Nº8: if you already have a database on Heroku Postgres, and want to migrate all existent data to your RDS Postgres instance, do the following:
Put your Heroku app in maintenance mode:
heroku maintenance:on --app your_heroku_applicationCapture and download a backup via command line, or using Heroku Postgres interface.
Uncompress it to raw SQL:
# the `-n public` option restore only objects that are in the public schema
pg_restore -n public -O latest.dump > heroku_latest.sql
And then import into your RDS instance:
psql -f heroku_latest.sql --host=your.rds.database.endpoint --port=5432 --username=your-rds-db-username --password --dbname=your_rds_dbnameTip Nº9: after creating the Rails App Server layer, you can edit the layer and add additional operational system packages that will be available on all instances. Again, doing an analogy with Heroku you can think of this as "something like" Heroku Buildpacks. I want to reinforce the double quotes here. There's no such thing as Buildpacks on OpsWorks. This is just an analogy. You probably wrote one Buildpack if you already needed to run a package that is not part of the default set of installed packages.

For instance, if you use the pg gem, add the postgresql93-devel and postgresql93-libs packages. Also, don't forget to add nodejs package. We will use it to precompile application assets.
We're almost there. At this point, we have configured the software that will run on the server. Now it's time to create the instances themselves which are the servers that will execute and run the application code.
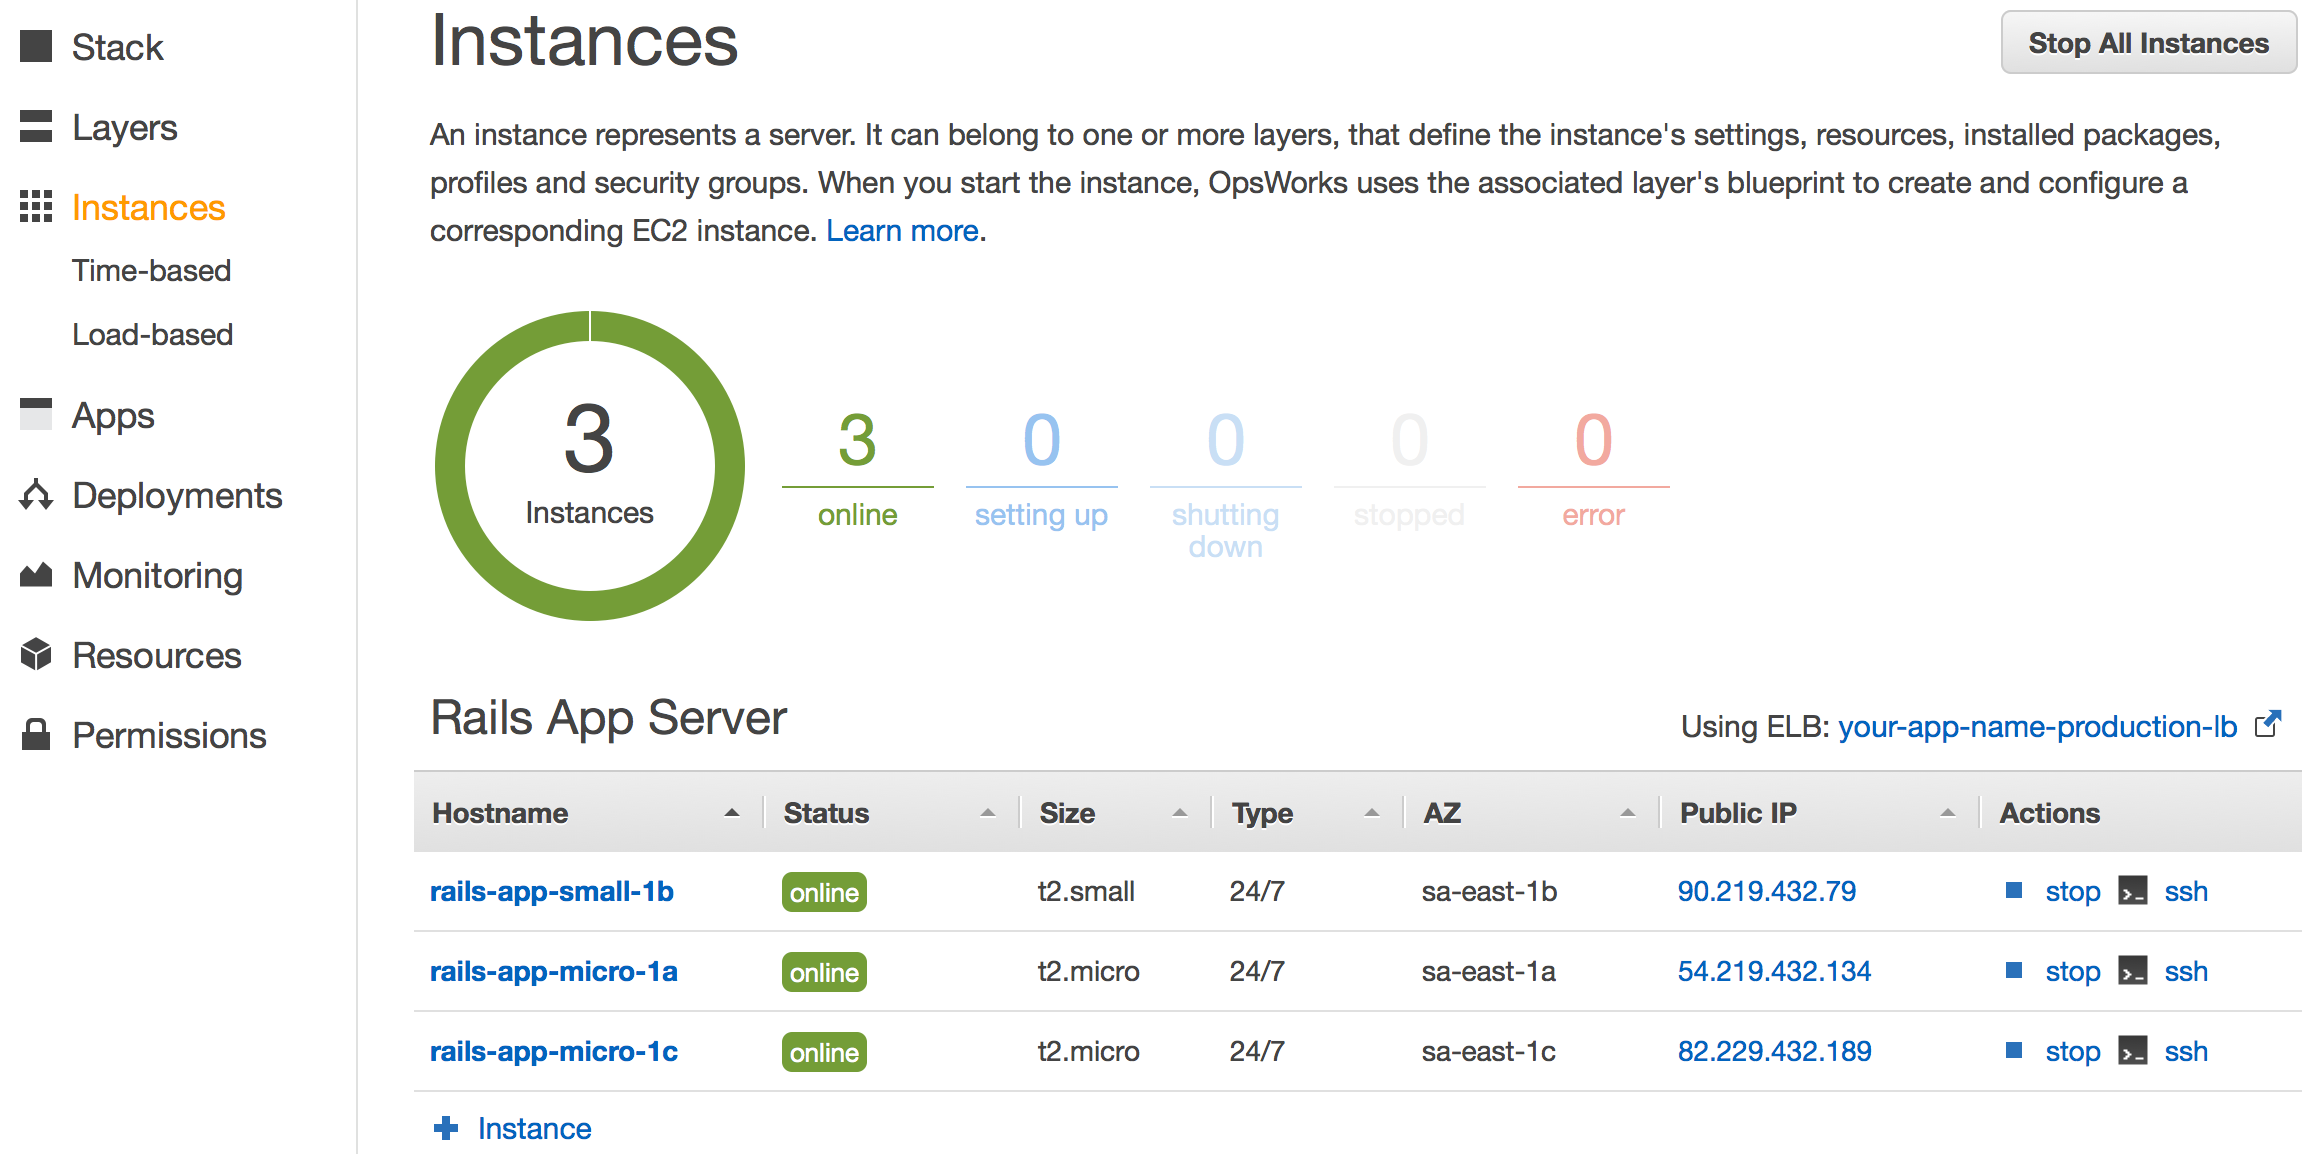
Tip Nº1: instances can be started manually, or configured to start and stop on a schedule or in response to load patterns.
Tip Nº2: a common practice is to spread your instances over subnets in multiple AZs for higher redundancy.
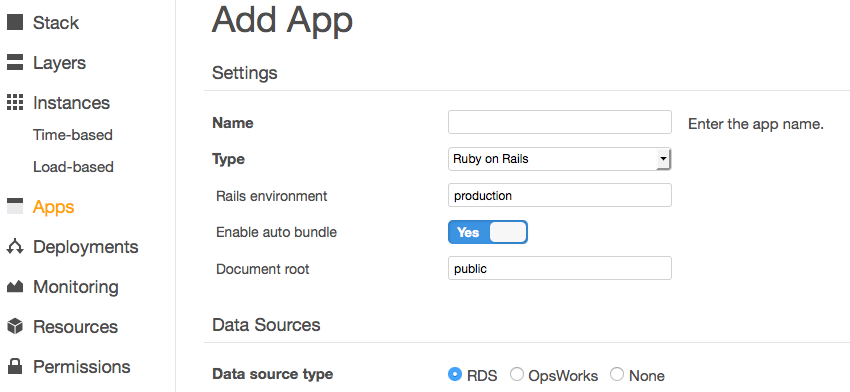
Adding an app to the stack is the first step to deploying an application to your application servers. An AWS OpsWorks application represents code that you want to run on an application server. The code itself resides in a repository such as an Amazon S3 archive or a GitHub repository.
With the AWS OpsWorks interface is very easy to register an application. Just click on Apps and on the +add link. From now on just fill out the form which is pretty straightforward. Bellow are a couple more tips and reminders.
Tip Nº1: when you deploy an application, AWS OpsWorks triggers a deploy event, which runs each layer's Deploy recipes. Each of the built-in application server layers includes a set of Deploy recipes, which use the data from the stack configuration and deployment JSON to automatically deploy the app's code from the repository to the layer's instances. The Deploy recipes also handle related tasks such as restarting services and setting up database connections.
Tip Nº2: you can use a private git repository as application source. You just have to configure the repository ssh key on both sides (in the OpsWorks application configuration and your repository).
Tip Nº3: if you have multiple environments (staging, production, etc.) you can configure to source the application from a specific branch corresponding to the environment name.
Tip Nº4: select RDS as data source type if you are using an RDS database layer.
Tip Nº5: not exactly a tip, but a reminder: you can (and should!) use environment variables to store your secret keys and third-party credentials. A common practice is to set at least the RACK_ENV and RAILS_ENV env vars.
Tip Nº6: add your application domains or subdomains filling in the Domains section. Use the DNS manager of your domain to configure the records. You have the following options:
- add an A record pointing it to the specific instance IP address. This is not good because this IP changes every time you stop and start the instance.
- grab the instance Public DNS and add a
CNAMErecord pointing to it. Again this is not good, because this address also changes after a full stop/start since the IP address composes the name of instance Public DNS endpoint. - the correct approach is to use a Load Balancer layer and use the DNS name of the Elastic Load Balancer associated with this layer. This endpoint never changes and all requests will be balanced to all available instances.
Tip Nº7: if your application uses HTTPS you have to configure the SSL certificates. You just have to enable the SSL switch and fill the textareas with the contents of your purchased certificate files as follows:
- SSL certificate: enter the SSL certificate (usually:
-----BEGIN CERTIFICATE-----...-----END CERTIFICATE-----). Comodo issued certificates can do the following:
cat your_issued_certificate_name.crt COMODORSAAddTrustCA.crt COMODORSADomainValidationSecureServerCA.crt AddTrustExternalCARoot.crt > bundle.crt
# copy the bundle contents and paste into the SSL certificate textarea
pbcopy < bundle.crt- SSL certificate key: copy and paste the contents of the key generated with your certificate (normally this file is called
server.key).
The SSL certificates of Certification Authorities textarea is optional, used for intermediate CA key or Client Authentication.
Tip Nº1: write your own deploy scripts and use the aws command line tool to automate the application deployment of your OpsWorks applications. The following command creates the deployment of an AWS OpsWorks application:
aws --region='<stack-region>' opsworks create-deployment --stack-id='<stack-opsworks-id>' --app-id='<app-opsworks-id>' --command='{\"Name\":\"deploy\"}'Just replace the <stack-region>, <stack-opsworks-id> and <app-opsworks-id> with the corresponding values for your stack and application. These ID's you find viewing the stack and the app respectively.
Tip Nº2: you probably configured a default SSH Key for your instances (tip number 2, under adding stacks). Having a configured SSH key allows you to SSH directly an instance by its IP address or Public DNS. As one example, if you want to manually check the Rails application logs on a running instance:
# Attention: the default username can change depending on instance's operational system.
# Open the Instances list under OpsWorks and check how to connect to a specific instance clicking on its ssh link.
ssh -i ~/.ssh/your_ssh_key [email protected]
sudo su deploy
cd /srv/www/your_app_short_name/current/log
tail -f staging.log
Tip Nº3: Chef deploy callbacks can help you to automate your deployment scripts. Just create a directory in your app called deploy and add files named for the appropriate callbacks. For example, here's how you can handle assets pre-compilation, expose environment variables during the deployment, and perform common database tasks like running migrations and seeds.
deploy/before_restart.rb
rails_env = new_resource.environment["RAILS_ENV"]

Chef::Log.info("Mapping the environment_variables node for RAILS_ENV=#{rails_env}...")
node[:deploy].each do |application, deploy|
  deploy[:environment_variables].each do |key, value|
    ENV[key] = value
  end
end

Chef::Log.info("Precompiling assets for RAILS_ENV=#{rails_env}...")
execute "rake assets:precompile" do
  cwd release_path
  command "bundle exec rake assets:precompile"
  environment "RAILS_ENV" => rails_env
end
deploy/after_restart.rb
rails_env = new_resource.environment["RAILS_ENV"]

Chef::Log.info("Migrating database for RAILS_ENV=#{rails_env}...")
execute "rake db:migrate" do
  cwd release_path
  command "bundle exec rake db:migrate"
  environment "RAILS_ENV" => rails_env
end

Chef::Log.info("Seeding database for RAILS_ENV=#{rails_env}...")
execute "rake db:seed" do
  cwd release_path
  command "bundle exec rake db:seed"
  environment "RAILS_ENV" => rails_env
end
I encourage you to play with AWS OpsWorks. With a very simple interface, almost any developer can model and map the components of their applications. Plus you can take advantage and use other services available on AWS Cloud. For example, CloudWatch to monitor your applications and resources, creating custom alarms, or using hundreds of metrics and graphs. Also, take a look at RDS database monitoring options — you will be amazed. Also, there are many other services available. I can't list all of them here.
And don't get me wrong: I'm not comparing OpsWorks with Heroku in any way. For me, they are entirely different things. Seriously, I already tested a lot of services out there, and I continue checking every time something new appears on the scene. However, I was not able to find a competitor to beat Heroku's ease of use. All analogies in this post are to help "Heroku-only" developers to understand OpsWorks vocabulary and how it works.
The simplicity of OpsWorks makes it a reliable option for delivering your applications. Highly productive, powerful, and flexible, supporting any software that you would like to use with scripted installations.
If you are looking for another choice to deliver your applications, definitely it's time to give AWS OpsWorks a chance.